Home
Lost Reg Code?
News
Online KiwiSDRs
macOS Software
Windows Software
Ham Radio iPhone/iPad
Linux Software
Support/FAQ
Update Policy
USB Icom CI-V Interface
Radio Hobbyist Products
22m Programmable Beacon Kit
CW Keyer For Beacons Kit
Jellyfish Transformer
Cyclops Antenna Transformer
General Interest Programs
Atomic Mac/PC
Audiocorder
Audio Toolbox
Black Cat Timer
Diet Sleuth
iUnit
Graffikon
Graph Paper Maker
Health Tracker
Image Resizer
Knitting Wizard
Label Wizard
Prog Audio Gen
Sound Byte
Synth 76477
Amateur Radio Programs
AirSpyHF+ Server
Audiocorder
Black Cat Absolute ACARS
Black Cat ACARS
Black Cat ALE
Black Cat ALE Vacuum Cleaner
Black Cat NetFinder
Black Cat GMDSS
Black Cat HF Fax
Black Cat SSTV
Black Cat NAVTEX SITOR-B
Carrier Sleuth
Cocoa 1090
Cocoa RTL Server
DGPS Decoding
DX Toolbox
Elmer
MatchMaker
KiwiKonnect
KiwiSDR Monitor
KiwiSDR Sound Client
MININEC Pro
Morse Mania
MultiMode
sdrRewind
RF Toolbox
SDRuno Plugin
SDRuno Equalizer Plugin
SelCall
Sonde
iPhone/iPad Apps
ALE
Atoms To Go
dB Calc
Clik Trak
DGPS Decoder
Drill Calc
DX Toolbox
Elmer Extra
Elmer General
Elmer Tech
Feld Hellschreiber
Field Strength Calc
Function Generator Pad
GMDSS
Godafoss
HF Weather Fax
iAttenuate
iFunctionGenerator
iSoundex
iSoundByte
iSweep
iUnit
Morse Mania
ACARS Pad
Morse Pad
NAVTEX Pad
Packet Pad
PSK31 Pad
SSTV Pad
Photon Calc
Rad Map Tracker
RF Link Calc
SelCall Tone Gen
Sound Byte
Sound Byte Control
Spectrum Pad
SWBC Schedules
Synth 76477
Synth Motion
Transmission Line Calc
Weather Calc
Wire Calc
iPhone/iPad Bundles
RF Calculator Apps
Ham Radio Decoder Apps
Audio Utility Apps
Shortwave Weather Apps
Ham Radio Exam Study Apps
Shortwave Decoder Apps
About Black Cat Systems
Site Map
Our software for Mac OSX
Privacy Policy
Press/Media
HFunderground
Apple /// Emulator
Macintosh Links
Shortwave Radio
Pirate Radio
Spy Numbers Stations
Science and Electronics
Ham Radio Software
ClikTrak Tally Counter
 ClikTrak is a tally counter, or event counter, that you can customize. It also features extensive reporting capabilities, as well as the ability to clone setups to other devices, making it easy for multiple users to track the same set of events.
ClikTrak can be used to count people, animals, or events. It can also be used for taking surveys, with each possible answer an event that gets counted.
Each count event can also be logged with a timestamp (date and time the event occurred) as well as the location of the event.
Reports summarizing the count totals for each event type, as well as a listing of each event timestamp and location can be generated and sent via email, or transferred to your computer via file sharing.
Getting Started
A quick reminder! When you first launched ClikTrak, your device asked whether or not the app could use your location. If you did not give it permission, it will not be able to store your location with clicks. If you need to be able to do this, you will need to give ClikTrak permission. Run the Settings for your device, go to Privacy, then under Location Services (or Location under iOS 8) find ClikTrak and make change the setting to give it permission.
ClikTrak comes pre-loaded with an example set up, which you can delete, so you can learn how to use the app.
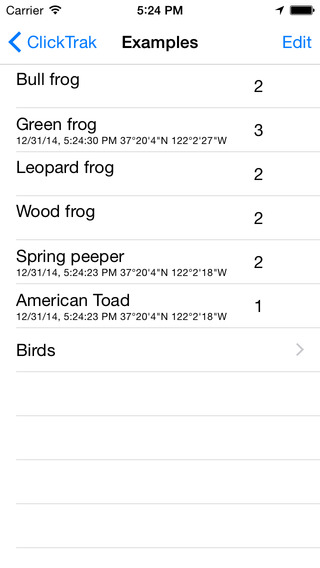
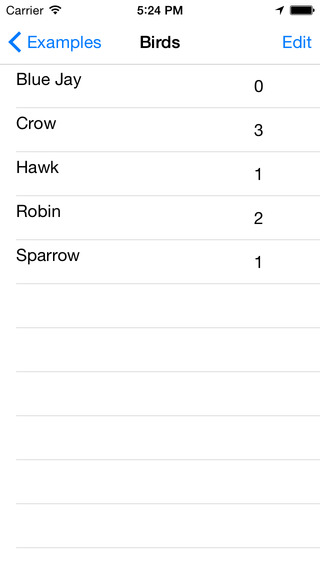
When first launched, you will see a ring called Examples. Tap it, and you'll see a number of clickers, each the name of a type of frog, along with another ring of clickers at the bottom called Birds.
Initially, the count for each clicker is of course zero. You can tap on the number for each clicker, and it will increment, registering the click. Go ahead and tap some of the clickers, to register events, so we'll have some data to look it.
We can look at the click history for each clicker, as well as configure it. Tap the Edit button in the upper right corner to go into edit mode. Then tap on the letter i with a circle around it. From this configuration, you can change the name of the clicker, as well as specify whether or not timestamps (the date and time each event occurred) as well as your position are stored with each event. You can also see the number of clicks for that clicker, which you can edit if you wish.
If a clicker is configured to record a timestamp and/or position, you can tap on Click History to see all those events. Note that this list will be blank if that clicker is not storing timestamps or position. When viewing events, you can go into Edit mode to selectively delete some of them or tap Clear to delete all of them.
Go back to the Examples ring, and you can re-order the clickers while in Edit mode, or add a new clicker, or delete clickers.
Also in Edit mode is the option to add a new ring, in the lower left corner. After created a new ring, you will probably want to change the name, as with a new clicker.
Setup
From the main view, you can tap Setup in the upper left corner to change a few things:
First, you can change whether the default setting is for newly created clickers to have store timestamps or positions turned on. Note that this only affects clickers you create after changing this setting, it will not affect clickers that already exist (so you can have a mix of settings).
Second, you can also enable the last timestamps and/or position for a clicker to be displayed under it. Note that this only affects the display, it does not cause these values to be stored with each click, that is a separate setting.
Reports
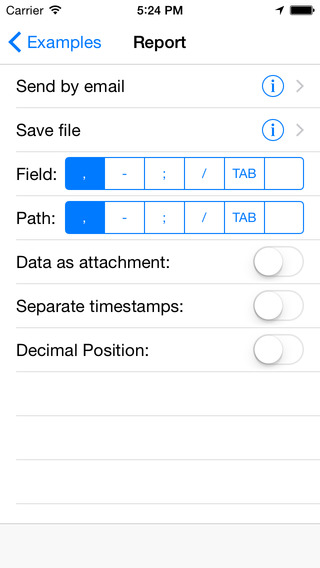
ClikTrak can generate reports of clicks. Go into Edit mode, and tap Report in the lower right corner. You have a few choices here:
- First, you can have your report sent by email.
- Second, you can have it saved on your device as a text file, and use iTunes File Sharing to copy it to your computer (see below how to use File Sharing)
- Third, you can select the character to use to delimit fields in the report
- Fourth, you can select the character used to delimit parts of the path to a clicker name. The path of a clicker in a report is made up of the names of all of the rings it is in, plus the name of the clicker itself.
- Fifth, you can specify whether or not the report, if sent by email, should be sent as an attachment, rather than in the body of the email.
- Sixth, you can specify whether timestamp/position events, if you have any recorded, are sent as a separate attachment (only valid if attachments are turned on above)
- And finally, you can have position information, if it was recorded and will be sent, formatted as decimal numbers, rather than degrees, minutes, and seconds. South and West coordinates are negative numbers, North and East are positive.
Export / Import Clickers and Rings
You may decide that you want the same set of rings and clickers on multiple devices. With ClikTrak, it's easy to copy the settings from one device to many:
Go into Edit mode, and tap the Export button at the bottom of the screen. The file ClikRing.plist will be created. You can use iTunes File sharing (see below) to copy this file to your computer. You can then use File Sharing to copy it to other devices. You can also send it to other people, and they can use File Sharing to copy it to their device(s).
After copying the file to the new device, go into Edit mode, and tap Import at the bottom of the screen to import it into the current ring. Note that if the file cannot be found (perhaps it was not copied, or the name was accidentally changed?) an error message will be displayed, alerting you to this.
Some notes about exporting and importing:
When you export, you create a file containing any clickers and sub rings from the current ring you have open, not all of the rings or clickers on your device. This lets you export just some of them.
When you import, you import the clickers and rings into the ring you currently have open. These new clickers and rings are added, they do not replace your existing rings and clickers.
iTunes File Sharing
These instructions are for iTunes version 12, different versions of iTunes may have a slightly different way to access device file sharing. Consult the documentation for your version of iTunes, or search on the web for detailed instructions for your particular version.
- Start iTunes on your computer
- Click on the icon for your device in the upper left corner of the iTunes window
- Click on Apps under Settings in the upper left part of the window
- Near the bottom of the window is File Sharing. Look for ClikTrak and click it to select it
- To the Right you will see ClikTrak Documents.
- You can select a document and click the Save To… button to save it to your computer.
- You can click the Add button to add a file from your computer to ClikTrak.
If you generated a report, it will be named Report followed by the date and time the report was created.
You can also see any report attachments that were created and sent via email, and copy them as well, if you wish.
If you exported a ClikRing.plist file, you can copy it from here to your computer, and then onto another device, to import it.
Contact Us
If you have additional questions not answered here, suggestions, or even a bug report, please contact us at info@blackcatsystems.com We look forward to hearing from you!
Please also consider reviewing ClikTrak on the App Store, we would greatly appreciate it!
Are you looking for a technology or radio related iPhone/iPad app but can't find one that does what you want? Have an idea for an app that you'd like to see? Contact us at info@blackcatsystems.com!


